```html
Build My Own Sofa Table: A Comprehensive Guide
A sofa table, also known as a console table, is a versatile piece of furniture often placed behind a sofa or along a wall. It provides a convenient surface for lamps, decorative items, or even a temporary workspace. Building a sofa table allows customization to precisely fit specific needs and aesthetic preferences. This article offers a comprehensive guide to building a sofa table, outlining the necessary steps, materials, and considerations for a successful project.
Planning and Design
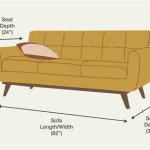
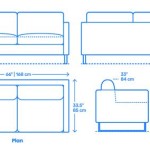
The initial stage involves careful planning and design. This includes determining the dimensions, style, and functionality of the sofa table. Accurate measurements of the space where the table will be placed are crucial. Consider the height of the sofa back to ensure the table's top surface is at a comfortable and visually appealing level. Common heights range from 28 to 32 inches, but adjustments may be necessary based on individual sofa dimensions.
Style considerations are equally important. The sofa table should complement the existing décor of the room. Options range from modern and minimalist designs featuring clean lines and simple materials to more rustic styles incorporating reclaimed wood and distressed finishes. A sketch or digital rendering of the planned table can be highly beneficial in visualizing the final product and identifying potential design flaws before construction begins.
Functionality also plays a role in the design process. Consider whether the table will primarily serve a decorative purpose or if it requires additional storage. Shelves, drawers, or a combination of both can be incorporated into the design to enhance its utility. If the table is intended to hold lamps or electronics, consider including wire management solutions to keep cords organized and out of sight.
Material Selection
The choice of materials significantly impacts the overall aesthetic and durability of the sofa table. Wood is the most common material for furniture construction, offering a wide range of options in terms of appearance, cost, and workability. Softwoods like pine and fir are relatively inexpensive and easy to work with, making them suitable for beginners. Hardwoods like oak, maple, and cherry offer greater strength and durability, along with a more refined appearance. However, they are generally more expensive and require more advanced woodworking skills.
Plywood and MDF (Medium-Density Fiberboard) are engineered wood products that can be used for various components of the table, particularly for shelves or panels. Plywood offers good strength and stability, while MDF provides a smooth, paintable surface. However, both materials are susceptible to moisture damage and should be properly sealed or finished if exposed to humid environments.
Beyond wood, other materials can be incorporated to add visual interest or enhance functionality. Metal legs or accents can create a modern industrial look. Glass or stone tops can provide a durable and elegant surface. When selecting materials, consider the overall budget, desired aesthetic, and level of woodworking skill.
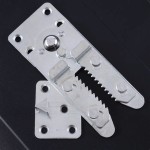
Fasteners are another critical consideration. Wood screws, nails, and construction adhesive are commonly used to join wood components. The type and size of fastener should be appropriate for the thickness and density of the wood being used. Pocket screws are a popular choice for creating strong and concealed joints. Metal fasteners, such as bolts and nuts, may be required for attaching metal legs or supports.
Construction Process
The construction process involves a series of steps, beginning with cutting the wood to the specified dimensions. Accurate measurements and precise cuts are essential for ensuring a square and well-fitting table. A circular saw or table saw can be used for making straight cuts, while a jigsaw or bandsaw is suitable for curved or intricate shapes. A miter saw is useful for cutting angles and creating angled joints.
After cutting the wood, the next step is to assemble the frame of the sofa table. This typically involves joining the legs, aprons (the horizontal pieces that connect the legs), and any other structural components. Various joinery techniques can be used, including butt joints, miter joints, mortise and tenon joints, and pocket screw joints. The choice of joinery technique depends on the desired strength, appearance, and level of woodworking skill. Glue and clamps should be used to secure the joints while the adhesive dries.
If the design incorporates shelves or drawers, these should be constructed and installed after the frame is assembled. Shelves can be attached using screws, nails, or shelf supports. Drawers require more intricate construction, involving cutting and assembling the drawer box, attaching drawer slides, and installing a drawer front. Accurate measurements and precise cuts are crucial for ensuring smooth drawer operation.
Once the basic structure is complete, any additional features, such as decorative trim or wire management solutions, can be added. Trim can be attached using nails, glue, or screws. Wire management solutions may involve drilling holes or installing clips or channels to route cords and cables.
Finishing and Protection
Finishing is the final stage of the construction process, and it plays a crucial role in protecting the wood and enhancing its appearance. Sanding is essential for creating a smooth and even surface. Start with a coarse-grit sandpaper (e.g., 80-grit) to remove any imperfections or scratches, then gradually progress to finer grits (e.g., 120-grit, 220-grit) to achieve a polished finish. Dust thoroughly after each sanding step.
The choice of finish depends on the desired aesthetic and level of protection. Paint provides a durable and opaque finish, allowing for a wide range of color options. Stain enhances the natural grain of the wood, adding depth and character. Clear finishes, such as varnish, lacquer, and polyurethane, protect the wood while allowing its natural beauty to shine through. Each type of finish has its own advantages and disadvantages in terms of durability, application, and appearance.
Before applying any finish, it is important to prepare the surface properly. This may involve applying a primer or sealer to improve adhesion and prevent the finish from soaking into the wood unevenly. Follow the manufacturer's instructions for application, using a brush, roller, or spray gun. Apply multiple coats of finish, allowing each coat to dry completely before applying the next. Lightly sand between coats to remove any imperfections and create a smooth surface.
For added protection, consider applying a topcoat of varnish or polyurethane. These finishes provide a durable and scratch-resistant surface, protecting the wood from everyday wear and tear. Apply the topcoat in thin, even layers, allowing each layer to dry completely before applying the next. Lightly sand between coats to remove any imperfections and create a smooth, glossy finish.
Proper curing time is essential for achieving the desired durability and appearance of the finish. Allow the finish to cure for the amount of time recommended by the manufacturer before placing any items on the table. Avoid exposing the table to excessive moisture or heat during the curing process.
Safety Considerations
Safety should always be a top priority when building furniture. Wear appropriate personal protective equipment (PPE), including safety glasses, a dust mask, and hearing protection, when operating power tools. Work in a well-ventilated area to avoid inhaling sawdust or fumes from finishes.
Familiarize oneself with the proper operating procedures for all power tools before using them. Always use sharp blades and bits, and keep your hands away from moving parts. Secure the workpiece firmly before cutting or drilling. Never force a tool beyond its capacity.
When working with finishes, follow the manufacturer's safety precautions. Many finishes contain volatile organic compounds (VOCs), which can be harmful if inhaled. Use finishes in a well-ventilated area, and wear a respirator if necessary. Dispose of used rags and containers properly, as they may be flammable.
Be mindful of electrical safety when working with power tools. Ensure that all tools are properly grounded and that electrical cords are in good condition. Avoid using extension cords if possible, and never operate power tools in wet or damp conditions.
```
30 Diy Sofa Console Table Tutorial Jenna Sue Design

30 Diy Sofa Console Table Tutorial Jenna Sue Design

Diy Wood Console Table Grace Oaks Designs

30 Diy Sofa Console Table Tutorial Jenna Sue Design

One More Problem Solved In My Family Room How To Build A Farmhouse Sofa Table Worthing Court Diy Home Decor Made Easy

Easy Diy Sofa Table My Pear Tree Home

Diy Console Table Out Of 2x4s A Turtle S Life For Me

30 Diy Sofa Console Table Tutorial Jenna Sue Design

Diy Wood Console Table Grace Oaks Designs

Easy Diy Sofa Table My Pear Tree Home