Crafting Your Own Queen Sleeper Sofa: A DIY Guide
The allure of a queen sleeper sofa lies in its dual functionality: a comfortable seating area by day and a spacious bed by night. This makes it an ideal solution for maximizing space in apartments, guest rooms, or multi-purpose living areas. While commercially available sleeper sofas can be costly, building one yourself offers a cost-effective alternative and allows for complete customization to suit individual preferences and spatial constraints. Constructing a DIY queen sleeper sofa is a challenging but rewarding project that requires careful planning, precise execution, and a moderate level of woodworking skill.
This article provides a comprehensive guide to building a DIY queen sleeper sofa, outlining the necessary materials, tools, and step-by-step instructions. A successful project hinges on meticulous planning and adherence to accurate measurements. Before embarking on the construction, one should thoroughly understand the basic principles of furniture building and possess a comfortable familiarity with power tools.
I. Planning and Material Selection
The foundation of any successful DIY project is a well-defined plan. This phase involves determining the overall dimensions of the sofa, the style and design aesthetic, and the specific functionalities desired. A detailed sketch or 3D model is highly recommended to visualize the final product and identify potential design flaws before construction begins. Queen-size mattresses typically measure 60 inches wide by 80 inches long, so this measurement will serve as a primary dimension for the sofa's sleeping surface.
Material selection is a crucial aspect of the planning process. The choice of materials not only affects the aesthetic appeal of the finished product but also its structural integrity and durability. The following materials are commonly used in constructing a sleeper sofa:
- Wood Framing: Hardwoods like oak, maple, or birch are excellent choices for the frame due to their strength and stability. Softwoods like pine can be used for less critical structural components but may require reinforcement. Ensure the wood is properly dried and free from knots or imperfections.
- Plywood: Plywood is used for the platform that supports the mattress and for creating smooth, even surfaces for upholstery. Choose a high-quality plywood with a minimum thickness of ¾ inch for optimal support.
- Upholstery Fabric: The choice of upholstery fabric depends on personal preference and intended use. Durable fabrics like canvas, denim, or microfiber are recommended for high-traffic areas. Consider stain-resistant and water-resistant options for added protection.
- Foam Padding: Foam padding is essential for creating comfortable seating and sleeping surfaces. High-density foam is recommended for the seat cushions and mattress, while softer foam can be used for armrests and backrests.
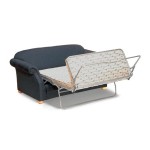
- Sleeper Sofa Mechanism: This is perhaps the most crucial component. Consider purchasing a pre-fabricated queen-size sleeper sofa mechanism. This component allows the sofa to transform into a bed and vice versa. Various types are available, and the selection should be based on budget, ease of installation, and desired functionality.
- Hardware: This includes screws, nails, bolts, hinges, and other fasteners required to assemble the frame and attach the sleeper sofa mechanism. Choose high-quality hardware that is appropriate for the type of wood being used.
- Upholstery Supplies: This includes batting, webbing, thread, buttons, zippers, and other materials required for upholstery. Choose upholstery-grade thread that is strong and durable.
Accurate measurements are paramount. Double-check all dimensions before cutting any wood. It is also advisable to create a cutting list to minimize waste and ensure that all necessary components are accounted for.
II. Frame Construction and Sleeper Mechanism Installation
The frame provides the structural support for the entire sofa. Constructing a sturdy and well-aligned frame is critical for the long-term durability and functionality of the sleeper sofa. The frame typically consists of side rails, front and back rails, and corner supports. These components are joined using screws, nails, and wood glue.
Begin by cutting the lumber according to the dimensions specified in the plan. Ensure that all cuts are square and accurate. Assemble the frame using screws and wood glue, paying close attention to alignment. Use corner clamps to hold the frame together while the glue dries. Reinforce the corners with additional supports for added strength. The frame must be strong enough to support the weight of the sleeper mechanism, mattress, and occupants.
Once the frame is assembled, install the sleeper sofa mechanism according to the manufacturer's instructions. This typically involves attaching the mechanism to the side rails using screws and bolts. Ensure that the mechanism is properly aligned and that it operates smoothly. Test the mechanism thoroughly to ensure that it extends and retracts without any binding or obstruction. This step may require careful adjustment to ensure proper functionality.
The platform that supports the mattress is typically constructed from plywood. Cut the plywood to size and attach it to the frame using screws and glue. Ensure that the platform is level and that it provides adequate support for the mattress. Consider adding additional supports underneath the platform to prevent sagging. Properly securing the platform is essential for ensuring a comfortable and stable sleeping surface.
III. Upholstery and Finishing
Upholstery is the process of covering the frame and cushions with fabric. This step requires patience, attention to detail, and a basic understanding of upholstery techniques. Before commencing the upholstery, it is essential to prepare the frame by padding it with foam or batting. This will create a softer surface and prevent the fabric from rubbing directly against the wood. Attach the foam or batting using spray adhesive or staples.
Cut the upholstery fabric according to the dimensions specified in the plan. Leave ample seam allowance for stitching. Pin the fabric to the frame and adjust it until it is properly aligned. Use a staple gun to attach the fabric to the frame, working from the center outwards. Ensure that the fabric is taut and free from wrinkles. Trim any excess fabric, leaving a clean and professional finish.
Seat cushions and backrests are typically constructed from foam padding wrapped in batting and then covered with fabric. Cut the foam padding to size and wrap it in batting. Sew the fabric cover, leaving an opening for inserting the foam. Insert the foam and batting into the fabric cover and close the opening with a zipper or hand stitching. Consider adding buttons or tufting for added detail and comfort.
Armrests can be upholstered in a similar manner to the seat cushions and backrests. Cut the foam padding to shape and attach it to the armrest frames using spray adhesive. Cover the foam padding with batting and then with fabric. Staple the fabric to the armrest frames, ensuring that the fabric is taut and free from wrinkles. Trim any excess fabric for a clean finish.
The finishing touches can significantly enhance the overall appearance of the sleeper sofa. Consider adding decorative piping or trim to the edges of the cushions and frame. Inspect the entire sofa for any imperfections and make any necessary repairs or adjustments. Apply a fabric protector to the upholstery to help prevent stains and extend the life of the fabric.
IV. Additional Considerations and Customizations
Several additional factors can be considered to enhance the functionality and aesthetics of the DIY queen sleeper sofa. These customizations can be tailored to individual needs and preferences.
- Storage Space: Incorporate storage space into the design by adding drawers or compartments underneath the seat. This can be a valuable feature for storing bedding, pillows, or other items.
- Adjustable Headrests: Consider adding adjustable headrests to the backrests for added comfort. This feature allows users to customize the headrest position to their preferred height and angle.
- Integrated Lighting: Integrate LED lighting into the armrests or backrests for ambient lighting. This can create a cozy and inviting atmosphere.
- Cup Holders and USB Ports: Add cup holders to the armrests and USB ports for charging electronic devices. These features can enhance the convenience and functionality of the sofa.
- Custom Fabric Patterns: Experiment with different fabric patterns and textures to create a unique and personalized look. Consider using contrasting fabrics for the cushions and frame.
Building a DIY queen sleeper sofa is a significant undertaking, but the rewards of a custom-built, cost-effective piece of furniture are well worth the effort. Thorough planning, careful execution, and attention to detail are key to a successful outcome. By following the steps outlined in this guide, individuals can create a functional and stylish sleeper sofa that meets their specific needs and complements their living space.

Diy Lounge Sofa Guest Bed Zevy Joy

Diy Lounge Sofa Guest Bed Zevy Joy

How To Make A Queen Mattress Into Sofa Diy Guide

Build Your Own Sofa Bed Diy Couch Plans Wannabe Clutter Free

Diy Sofa Bed

Queen Bed Turned Into Couch Home Decor Furniture

Diy Convertible Sofa Bed With Storage

Build Your Own Sofa Bed Diy Couch Plans Wannabe Clutter Free

Diy Caned Sofa Daybed Megan Bell

The Very Best Sleeper Sofas Tested And Reviewed By Our Editors Architectural Digest