How to Fix a Broken Sofa Arm: A Comprehensive Guide
A broken sofa arm can be a frustrating and inconvenient experience. It can turn a comfortable seating area into an unsightly eyesore and make relaxing on the sofa uncomfortable. Fortunately, fixing a broken sofa arm is a manageable task that can be accomplished with the right tools and techniques. This comprehensive guide will equip you with the knowledge and steps necessary to restore your sofa's structural integrity and aesthetic appeal.
1. Assess the Damage and Gather Materials
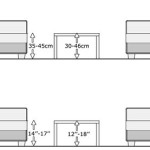
Before embarking on any repair, it's essential to assess the extent of the damage and gather the necessary materials. Carefully inspect the broken arm to determine the nature of the fracture. Is it a clean break, a crack, or a complete detachment from the sofa frame? This will help you determine the best course of action.
Once you understand the severity of the damage, you can gather the necessary materials. These may include: - Wood glue or epoxy - Wood screws or nails - Wood filler - Sandpaper - Paint or stain (to match the existing sofa) - Clamps - Workbench or stable surface - Safety glasses and gloves
2. Prepare the Broken Area
Before you start repairing the broken arm, it's crucial to prepare the area. This involves cleaning the broken surfaces to ensure a strong bond. Use a damp cloth to wipe away any dirt, dust, or debris. Allow the surfaces to dry completely before proceeding with the repair.
For a complete detachment, you may need to align the broken pieces carefully. Use clamps to hold the pieces in their original position while the adhesive dries.
3. Reattaching the Sofa Arm
The method of reattaching the broken sofa arm will depend on the nature of the damage. For a clean break, wood glue or epoxy will be suitable. Apply a generous amount of adhesive to the broken surfaces and clamp them together. Ensure the pieces are aligned correctly and leave the clamps in place for at least 24 hours to allow the adhesive to cure completely.
For cracks or minor damage, you may need to use screws or nails to reinforce the broken area. Drill pilot holes before inserting the screws or nails to prevent splitting the wood. Be sure to use screws or nails that are appropriate for the thickness of the sofa arm.
4. Fill and Sand
Once the adhesive has cured, you may need to fill any gaps or holes with wood filler. Apply a thin layer of filler, smoothing it evenly with a putty knife. Allow the filler to dry completely before sanding it down with fine-grit sandpaper until it is flush with the surrounding wood.
Sanding the entire repair area will create a smooth surface that can be easily painted or stained. This will ensure a seamless blend with the rest of the sofa.
5. Finishing Touches
After the repair has been completed, you can finish it with paint or stain to match the rest of the sofa. Apply the paint or stain in thin coats, allowing each coat to dry completely before applying the next. This will create a durable and aesthetically pleasing finish.
If you're unsure about the exact color or finish of your sofa, it's a good idea to test the paint or stain on a hidden area first. This will guarantee a perfect match and prevent any unwanted surprises.

Broken Sofa Arm Frame Ed Furniturerepairman Com

Broken Sofa Arm Frame Ed Furniturerepairman Com

Replace Cardboard On Sofa Arms To Fix Caved In Or Ed Arm Rests Diy Couch Furniture

Fixing A Broken Wooden Sofa Frame Exquisitely Unremarkable

Broken Sofa Arm Frame Ed Furniturerepairman Com

How Can I Repair A Ripped Couch Hometalk

Broken Couch Frame Repaired For Under 5

Diy How To Fix Broken Sofa Arm

Repairing A Broken Arm On Fabric Couch Thriftyfun

Our Broken Karlstad Turning It Home