How To Make Back Cushions For Sofa
Creating back cushions for a sofa is a rewarding project that allows for customization of comfort, style, and durability. It also provides an opportunity to repurpose existing materials, align with specific aesthetic preferences, and tailor dimensions to the individual sofa's specifications. The following guide offers comprehensive instructions on how to construct sofa back cushions, addressing material selection, cutting, sewing, and finishing techniques.
Material Selection and Preparation
The selection of appropriate materials is paramount to the overall quality and longevity of the back cushions. This includes choosing fabric, filling, and any necessary additional supplies, such as zippers or buttons.
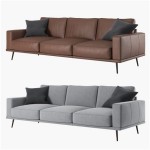
Fabric Choice: The fabric used for the back cushions should be chosen based on a variety of factors, including durability, aesthetics, and ease of cleaning. High-traffic areas and homes with pets or children may benefit from durable, stain-resistant fabrics such as canvas, denim, or synthetic blends like microfiber. For more formal settings, fabrics such as velvet, linen, or silk may be suitable, though they often require more careful maintenance. Patterned fabrics can add visual interest, while solid colors offer versatility. Before purchasing fabric, measure the sofa back to determine the required yardage. It is generally advisable to purchase slightly more fabric than calculated to account for potential errors or pattern matching requirements.
Filling Selection: The comfort of the back cushions is significantly influenced by the choice of filling. Commonly used filling materials include:
- Polyester Fiberfill: This is a common and cost-effective option. It is lightweight, hypoallergenic, and provides a soft, plush feel. However, it may flatten over time, requiring occasional fluffing or replacement.
- Down and Feather Blend: Down and feather blends offer a luxurious and comfortable option. They are soft, resilient, and conforming. However, they can be more expensive than other options and may require more specialized care.
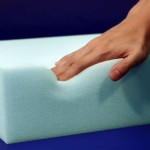
- Foam: Foam offers more structure and support than fiberfill or down. It is available in various densities, allowing for customization of firmness. Foam can be purchased in sheets and cut to size or in shredded form to mimic the feel of fiberfill.
- Combination Fillings: Combining different fillings can provide a balance of comfort and support. For example, a foam core can be wrapped in fiberfill for added softness.
Additional Supplies: Beyond fabric and filling, several other supplies may be needed to complete the back cushions:
- Sewing Machine: A sewing machine is recommended for creating durable and professional-looking seams.
- Sewing Thread: Choose a thread that matches the color and weight of the fabric.
- Scissors or Rotary Cutter: Sharp scissors or a rotary cutter are essential for accurate fabric cutting.
- Measuring Tape or Ruler: Use a measuring tape or ruler to ensure accurate measurements for cutting the fabric.
- Pins: Pins are used to hold fabric pieces together before sewing.
- Zippers or Buttons (Optional): Zippers or buttons can be used to create removable cushion covers, allowing for easier cleaning.
- Marking Tool: A fabric marker or tailor's chalk is used to mark cutting lines on the fabric.
- Seam Ripper: A seam ripper is useful for correcting sewing errors.
Cutting and Sewing the Cushion Covers
This stage involves accurately measuring, cutting, and sewing the fabric to create the cushion covers. Precise measurements and careful sewing are crucial for achieving a professional and well-fitting result.
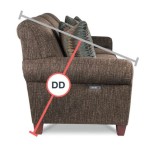
Measuring and Cutting: Begin by measuring the dimensions of the desired back cushions. Consider the overall height, width, and thickness of the cushions. Add seam allowances to these measurements. A standard seam allowance is typically 1/2 inch (1.3 cm). If using a patterned fabric, pay attention to pattern matching, ensuring that the pattern aligns correctly on the front and back of the cushions. Using a measuring tape and a fabric marker or tailor's chalk, mark the cutting lines on the fabric. Cut the fabric pieces using sharp scissors or a rotary cutter, following the marked lines precisely.
Sewing the Covers: With the fabric pieces cut to size, begin sewing the cushion covers. If adding a zipper, install it first. This typically involves sewing the zipper into the seam along the bottom edge of the cushion cover. With the right sides of the fabric facing each other, pin the front and back pieces together along the remaining edges. Sew along the pinned edges, using a sewing machine with a straight stitch. Remember to leave a small opening along one edge for inserting the filling. Reinforce the seams by backstitching at the beginning and end of each seam.
Turning and Finishing: After sewing the cushion covers, turn them right side out. Use a point turner or blunt object to gently push out the corners, creating sharp, defined edges. If desired, topstitch along the edges of the cushion covers for added durability and a more polished look. Topstitching involves sewing a straight stitch close to the edge of the fabric, enhancing the seam and preventing fraying. The opening left for filling can be closed by hand stitching with a blind stitch for an invisible finish, or by carefully machine sewing it closed.
Filling and Finishing Touches
The final step involves filling the cushion covers with the chosen filling material and adding any finishing touches, such as buttons or tufting.
Filling the Cushions: Gently begin filling the cushion covers with the selected filling material. Distribute the filling evenly throughout the cushion, ensuring that the corners are well-filled. If using fiberfill, break it up into smaller clumps to prevent lumps. If using foam, ensure that it is cut to the appropriate size and shape to fit snugly inside the cushion cover. Adjust the amount of filling to achieve the desired level of firmness and support. Overfilling can make the cushions feel hard and uncomfortable, while underfilling can result in a saggy, unsupported appearance.
Closing the Opening: Once the cushions are filled to the desired level, close the opening. If a zipper was not used, carefully hand stitch the opening closed using a blind stitch. This will create an invisible seam. Alternatively, the opening can be machine stitched closed, but this may be less aesthetically pleasing. Ensure that the stitching is secure to prevent the filling from escaping.
Adding Finishing Touches (Optional): To enhance the appearance of the back cushions, consider adding finishing touches such as buttons or tufting. Buttons can be sewn onto the front of the cushions to create a decorative effect. Tufting involves stitching through the cushion at regular intervals, creating a gathered or pleated appearance. This can add visual interest and texture to the cushions. Other finishing touches may include adding piping around the edges of the cushions or attaching decorative trim. These details can customize the appearance of the cushions and complement the overall style of the sofa and the room.
By following these steps, one can create custom back cushions for a sofa that are tailored to personal preferences and aesthetic requirements. The cushions will provide comfort and support, as well as enhance the visual appeal of the living space.

How To Sew Sofa Cushions

How To Fix Sagging Couch Cushions Thistlewood Farm

Made My Own Sofa Cushions No Seams Diy Pt 2

How To Fix Sagging Couch Cushions Thistlewood Farm

How To Plump Your Sofa Cushions

How To Re Stuff Sofa Cushions

Diy Couch How To Build And Upholster Your Own Sofa

Diy Couch How To Build And Upholster Your Own Sofa

Couch Back Cushion Stuffing Replacement

Couch Back Cushion Stuffing Replacement